Chances are that I’ve developed a new website for you but you want to know hot to manage your own WordPress blog post be able to add/edit/delete you blog or latest news posts yourself.
There are many tutorials on how to manage your own WordPress blog post so I’m not going to reinvent the wheel here. Instead I’ll give you the basic details on how to manage your own WordPress blog post what you need to do to prepare yourself, how to access WordPress administrator, how to create a new blog / news post and how to edit an existing post. I touch on the basics of Search Engine Optimisation but not in any detail. With that in mind, let’s begin.
How To Manage Your Own WordPress Blog Post – Preparation
Before you start you should get all your ducks in a row:
1) Key words / key phrase – think of what your target audience will type into the search engine to find your blog post.
2) Title – Include the key words in your title
3) Copy. There’s no real maximum copy but a good rule of thumb is to create approximately 300 – 400 words of copy that will engage your chosen audience. The ‘excerpt’ shown on the blog page is approximately 25 words long and by default is the first 25 words of your copy. Make sure your key words / key phrase appears in the first sentence and twice in the first paragraph.
4) Image(s) – Make sure you have continuity with your image dimensions. I recommend for blog posts to create images that are 1200px wide by 800px high at 72 dpi. File size is extremely important and you should adjust the image quality so as file sizes is less that 100KB (150-200KB max). Search engines use the Image file name along with ‘alt text’ tags to index the image. Make sure you rename the file so as it relates to the image content and the key words/phrase. Tip: use spaces in the filename instead of hyphens as WordPress will use the file name as the image title and will automatically replace spaces with hyphens during the upload process. ie the image on the right file name is ‘wordpress blog preparation get your ducks in a row.jpg’
5) Purpose & Links- Perhaps this should be #1 What do you want to achieve from the new post? Is it purely for information, do you want the visitor to click a link or get in touch? It’s good to include both relevant external links and internal links (links to other pages on your website) within the copy of the blog post. Make sure the hyperlink text relates to the url you send them to as this makes the sentence easier to read and search engines ‘read’ hyperlink text so it helps them to index your site. Avoid ‘for more information click HERE‘ and use something meaningful like ‘for more information take a look at my SEO from the Get-Go page.
Logging into WordPress
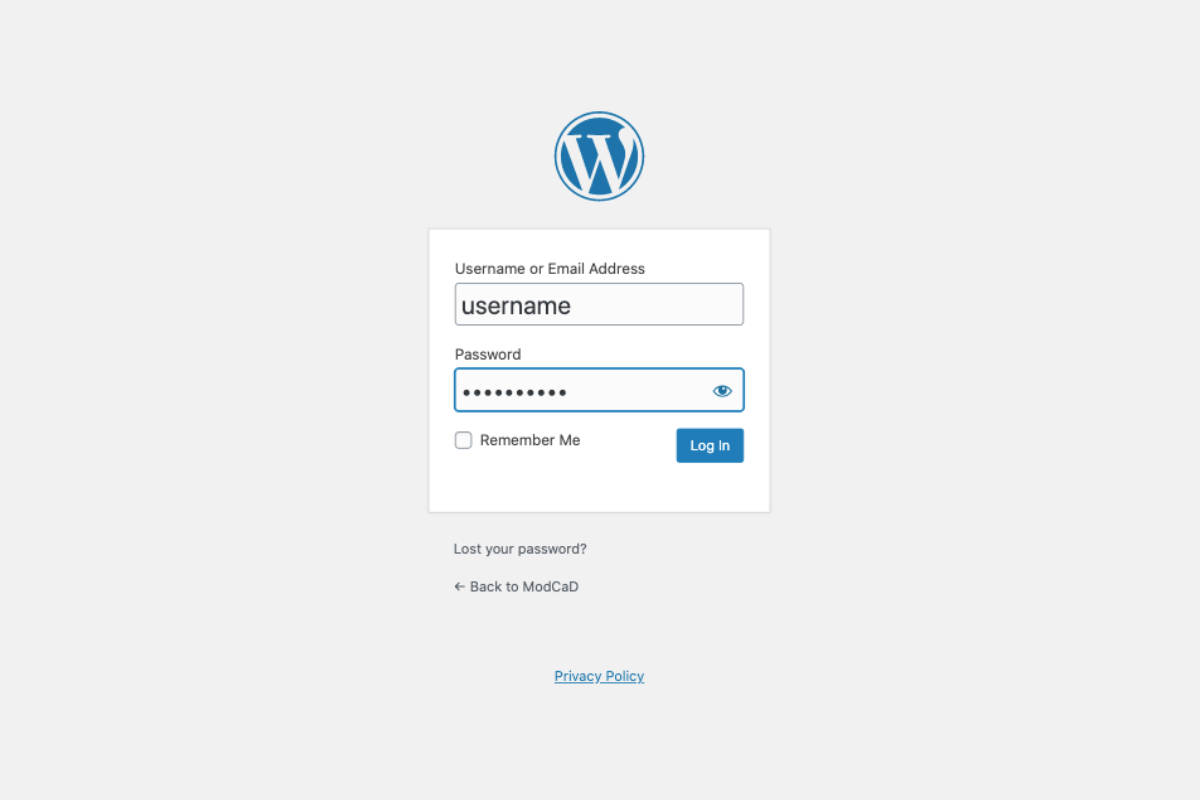
With all the above information to hand it’s time to manage your own WordPress blog post. Visit your website and in the address bar add /wp-admin to the end of your URL so as it looks something like www.mywebsiteurl.co.uk/wp-admin and hit enter.
Enter your username and password. If you are using a non-public computer and can trust everyone who has access to it then you can check the ‘remember me’ box before clicking ‘Login’
The WordPress Dashboard
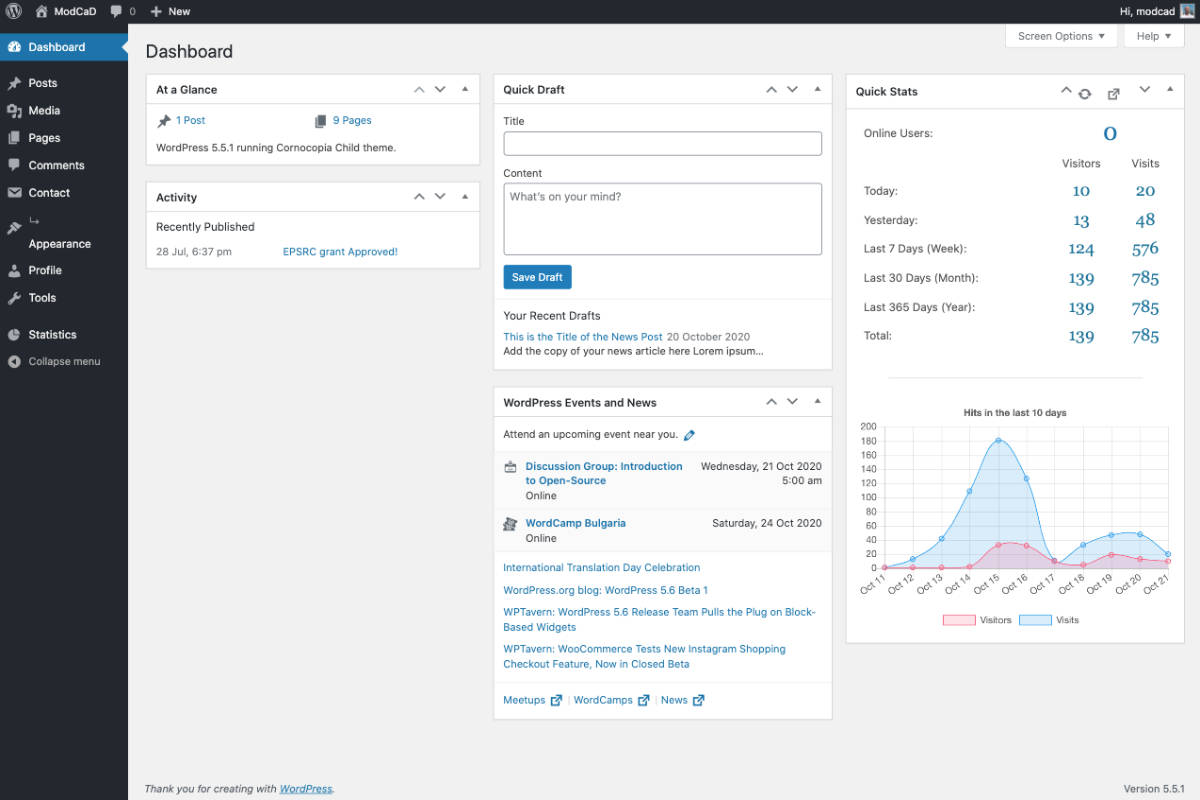
When you first open WP Admin, you will arrive at the Dashboard’s Home screen. This gives you an overview of what’s happening with your website. The left column is the primary navigation for the admin area.
There are two ways of adding content to a WordPress website, one by adding ‘Pages’ and the other by adding ‘Posts’. There are many resources on the web that will describe the difference between the two. In a nut shell a post is a way of adding content to a website displayed usually in chronological order on a page of your website.
This tutorial will focus on how to add/edit/delete posts that show on your ‘Blog’ and ‘Latest News” pages.
Posts Page
The posts page displays a summary of all the posts on your website, clicking on the title of an existing post allows you to edit it. Clicking on ‘Add New’ creates a new post. Tip: if you’re creating a new post that is very similar to an existing post you can hover the mouse over the existing post title and on the sub-menu that appears click on the ‘clone’ button. You can now click on the cloned post to give it a new title and edit it accordingly.
We will be clicking the ‘Add New’ button on this tutorial.
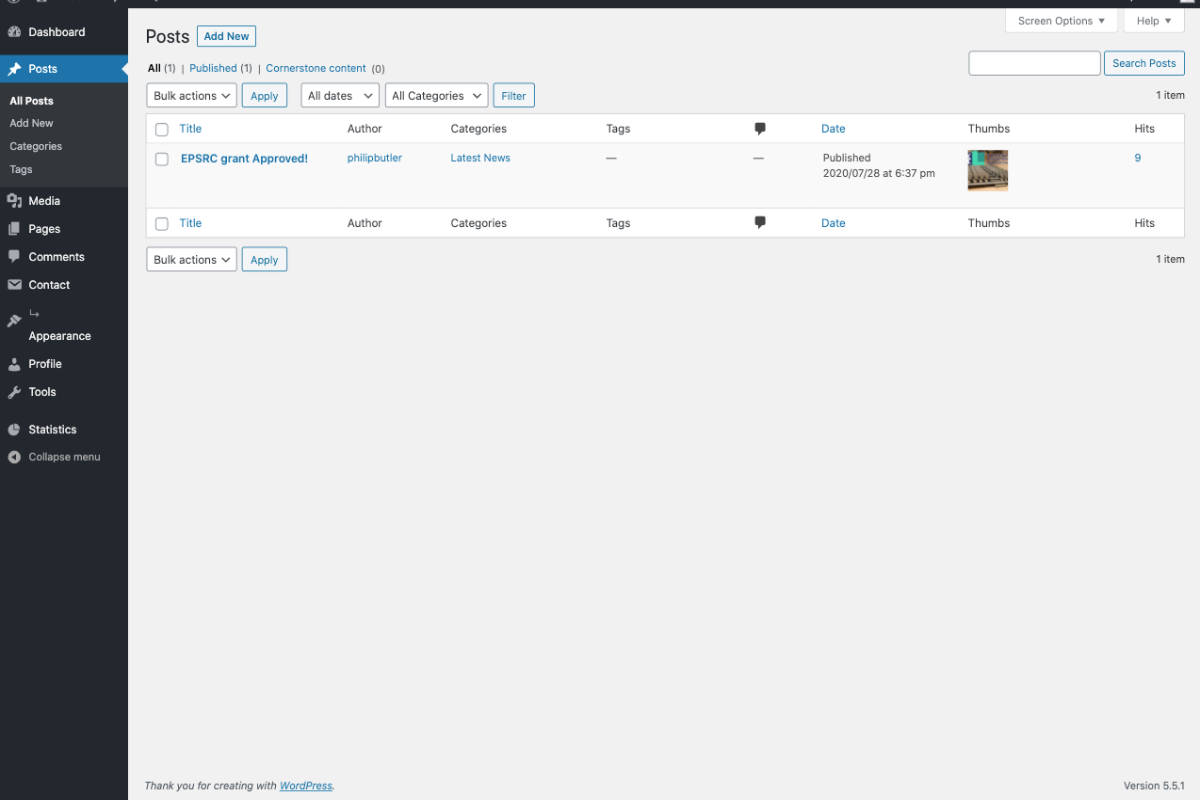
Add a New Post
Clicking the ‘Add New’ button will open the page editor, first we need to add our page title (strictly speaking this is a page heading not a page title). In the right hand column there should be two tabs, ‘document’ and ‘Block’. Select the ‘document’ tab to display the document settings.
Click the ∨ symbol to the right of the section heading to expand the section. Likewise clicking the ∧ symbol to minimise the section.
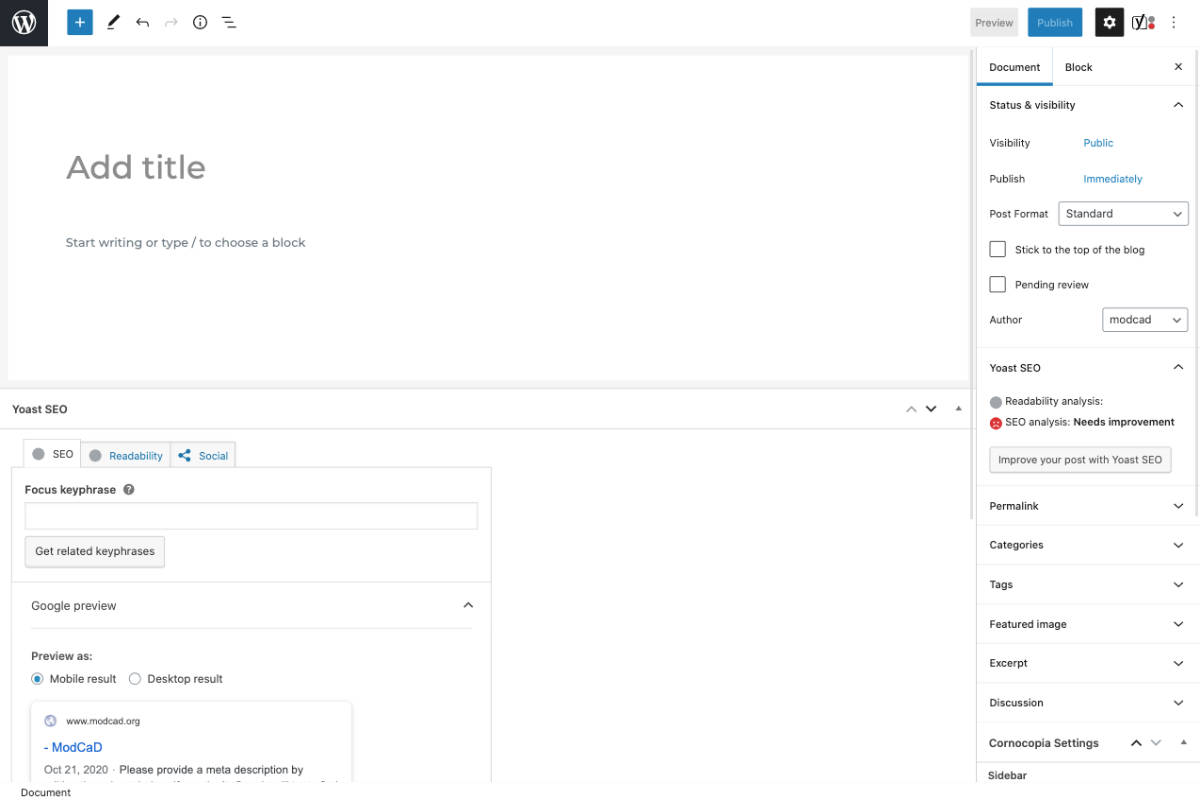
Document Settings – Publish Date
Posts are in chronological order using the Published Date to sort them. By default the date is set to when you create the new post. You can manually change this if you want the the new post to appear in a different order.
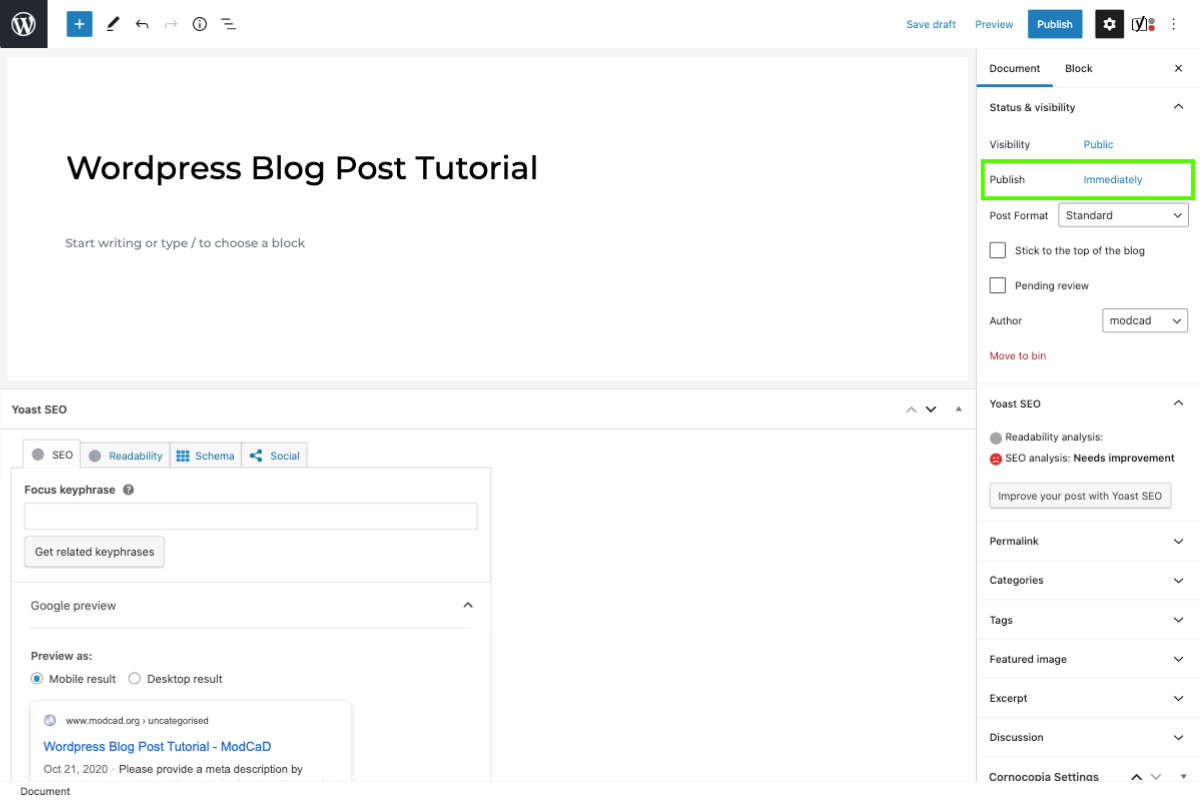
Document Settings – Permalink
We’ll skip over the Yoast SEO summary for the moment and take a look at the Permalink settings. The permalink is the quite simply the URL of your blog post. The last part of the URL (the URL slug) is automatically generated by WordPress based upon the page title. The auto-generated URL slug replaces all spaces with hyphens and converts the text to lowercase.
Under normal circumstances you don’t need to alter the permalink and changing it after the post has been published (and indexed by the search engines) is strongly discouraged. The only time you really need to edit the permalink is if you’ve opted to create the new post by cloning a previous post in step 4 above.
By cloning an existing post you also clone its permalink. To rectify this, simply select and delete the URL slug that is there and WordPress will create a new one based on the new page title (that you added in Step 5 above) when you click the publish/save/update button.
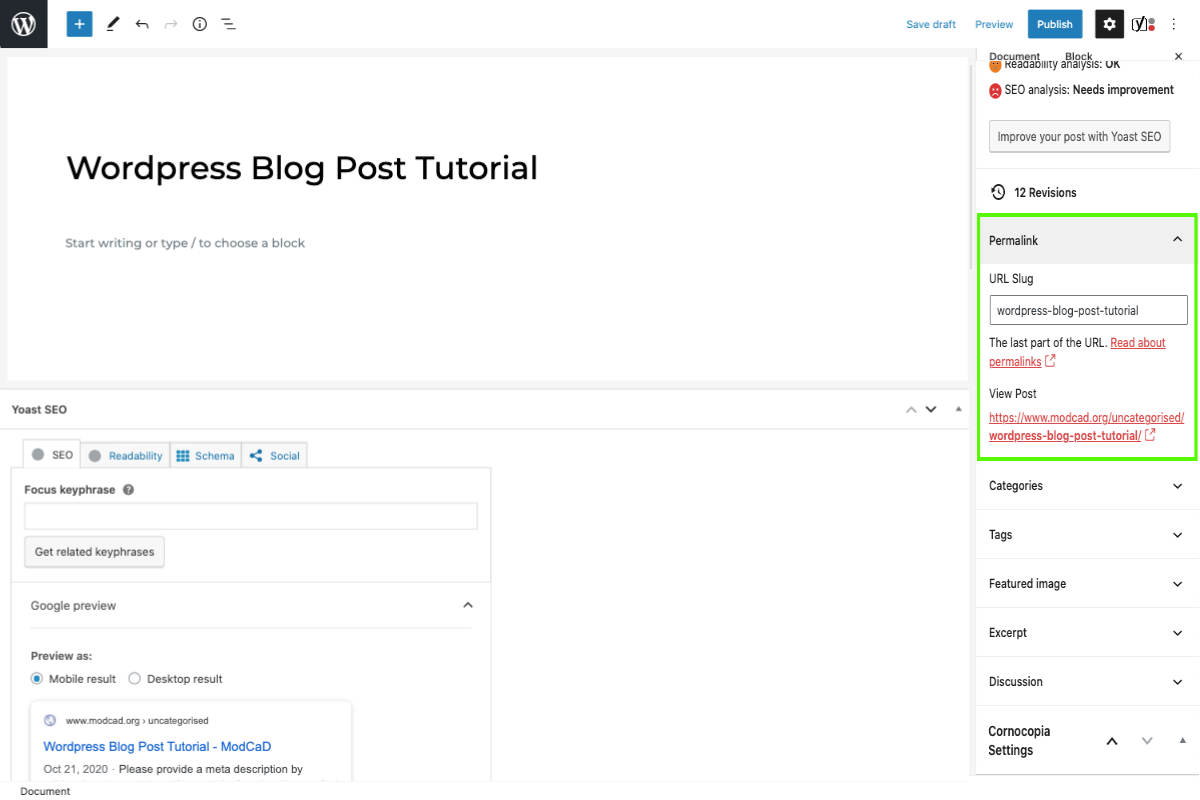
Document Settings – Category
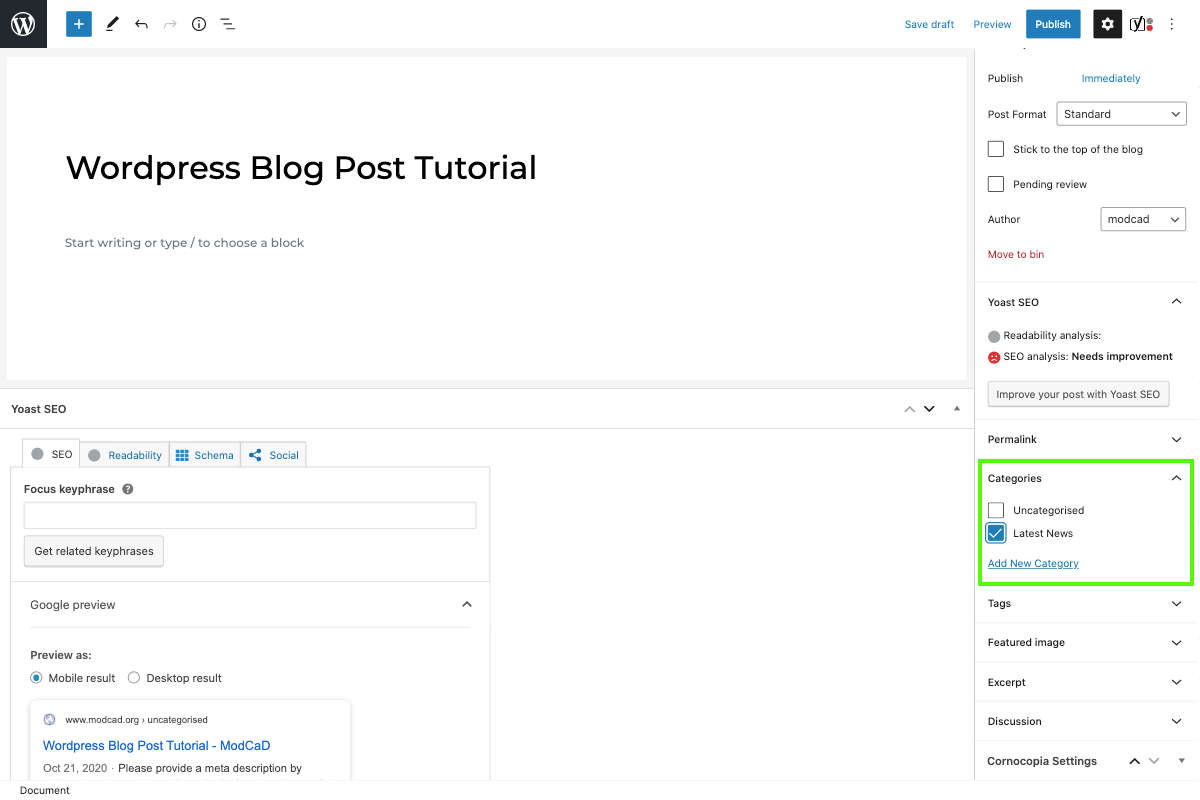
Select the category in which the blog post belongs to. Posts are grouped together in Categories. For most websites selecting the ‘blog’ category will show the post on the blog page, selecting the ‘Latest News’ category will show the post on the latest news page.
Document Settings – Tags
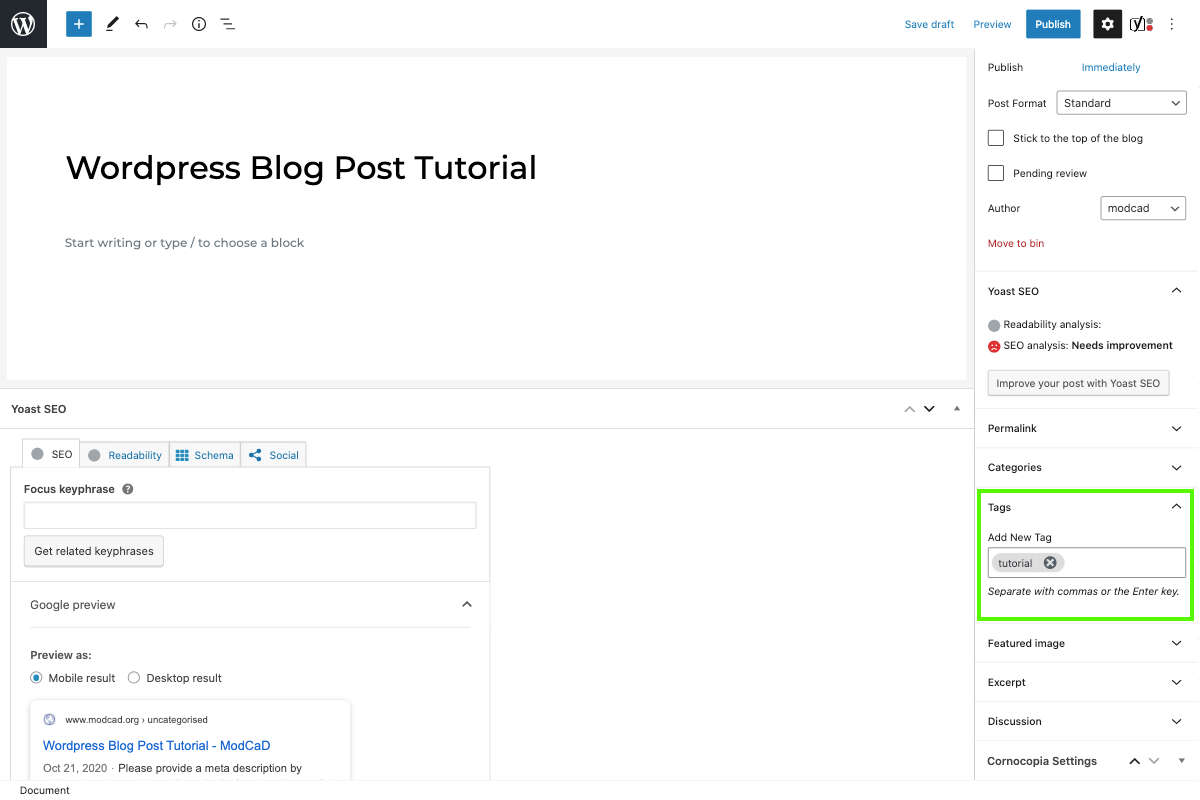
Use Tags to further group relating posts that are either within the same category or in different categories. An example may be you have several latest news posts relating to finance. Adding ‘finance’ as a tag to both posts would ‘link’ them together.
You can add several Tags separated by commas.
Document Settings – Featured Image
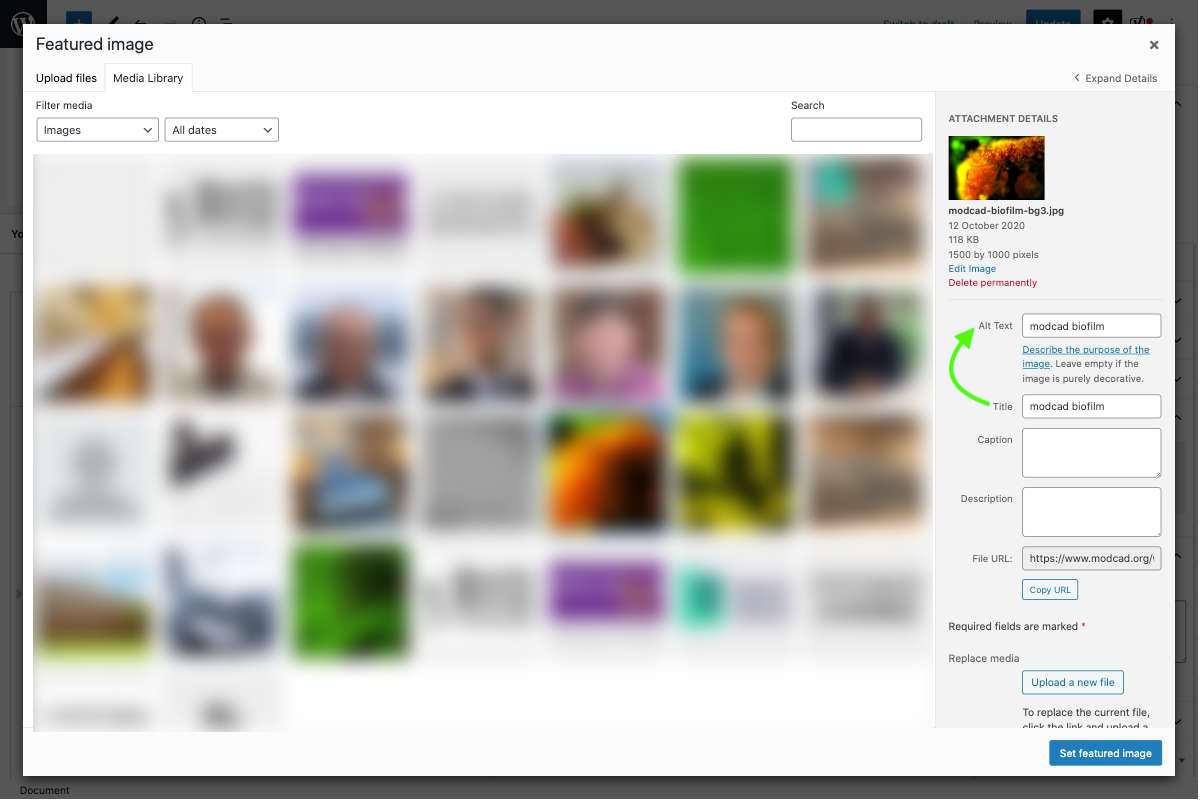
The Blog / Latest News page uses the Featured Image. Click the ‘Set Featured Image‘ button to open the Featured Image window which contains two tabs.
Media Library shows all the current media that has been uploaded to your site. If you’re using an existing image you can select it from this tab.
The Upload Files tab is where you can add new media by either dragging and dropping the image or by clicking the Select Files button. Once the file has been uploaded you’ll see that the ‘Title’ field has automatically been filled in using the file name (now you see why using spaces in the file name as opposed to using hyphens helps).
Before clicking the ‘Set Featured Image’ button you MUST fill out the ‘Alt Text’ field. The easiest way to do this is to copy the content of the Title field and paste it into the Alt Text field. Now you can click the ‘Set Featured Image’ Button.
Document Settings – Excerpt
For all this is an optional field, it’s good practice to get into the habit of writing and filling in this field for two reasons.
By default the excerpt that is shown on the blog page will be the first 25 words (108 – 140 characters including spaces). The reason why I’ve set the limit to this is because if we stick to those limits we can use the same excerpt for our SEO ‘meta description’ which I’ll cover later in this tutorial.
The excerpt must include the ‘key phrase’ that not only describes what the post is about but also what a person would type into a search engine to find your page.
We’re now ready to actually start writing our blog post.

The WordPress Block Editor
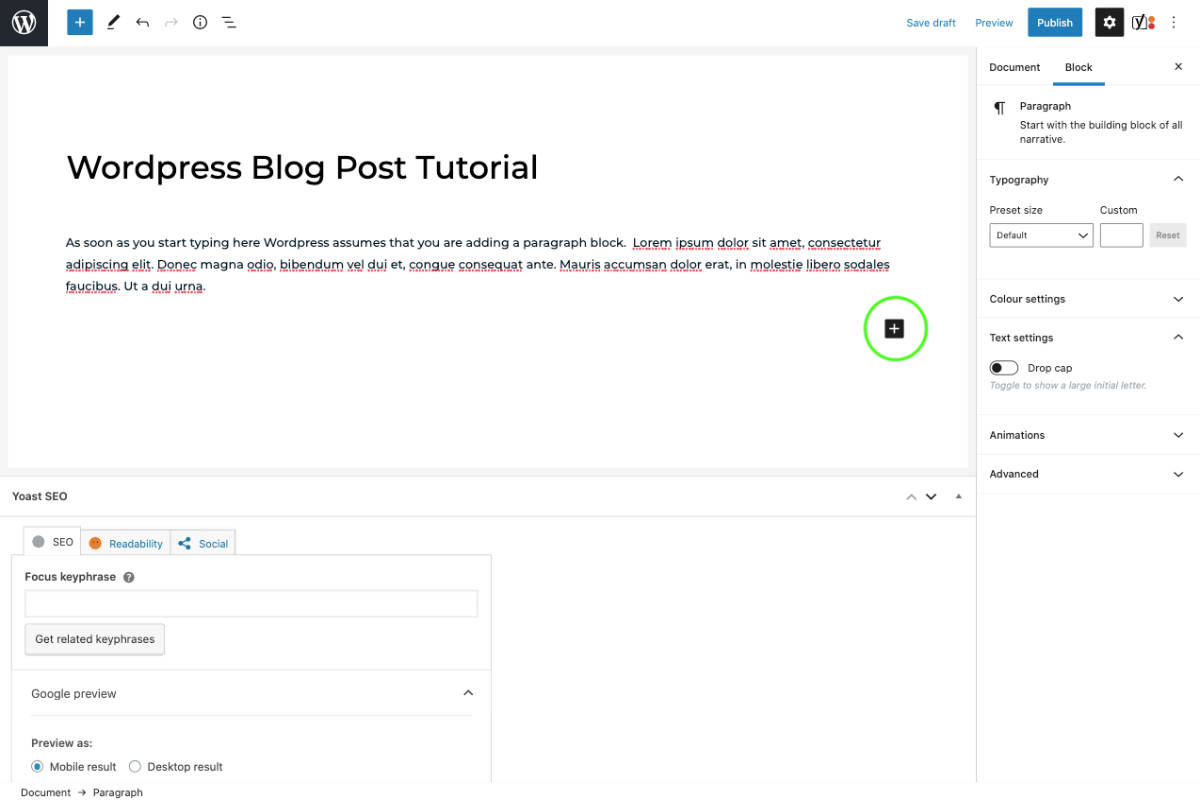
In the WordPress editor, each paragraph, image or video is a distinct “block” of content. Each block comes with its own set of controls for changing things like colour, width and alignment. These will show and hide automatically when you select a block.
All of the blocks available to you live in the block library. You’ll find it wherever you see the icon.
This tutorial will discuss the basics however here’s a detailed guide on how to use the WordPress Block Editor.
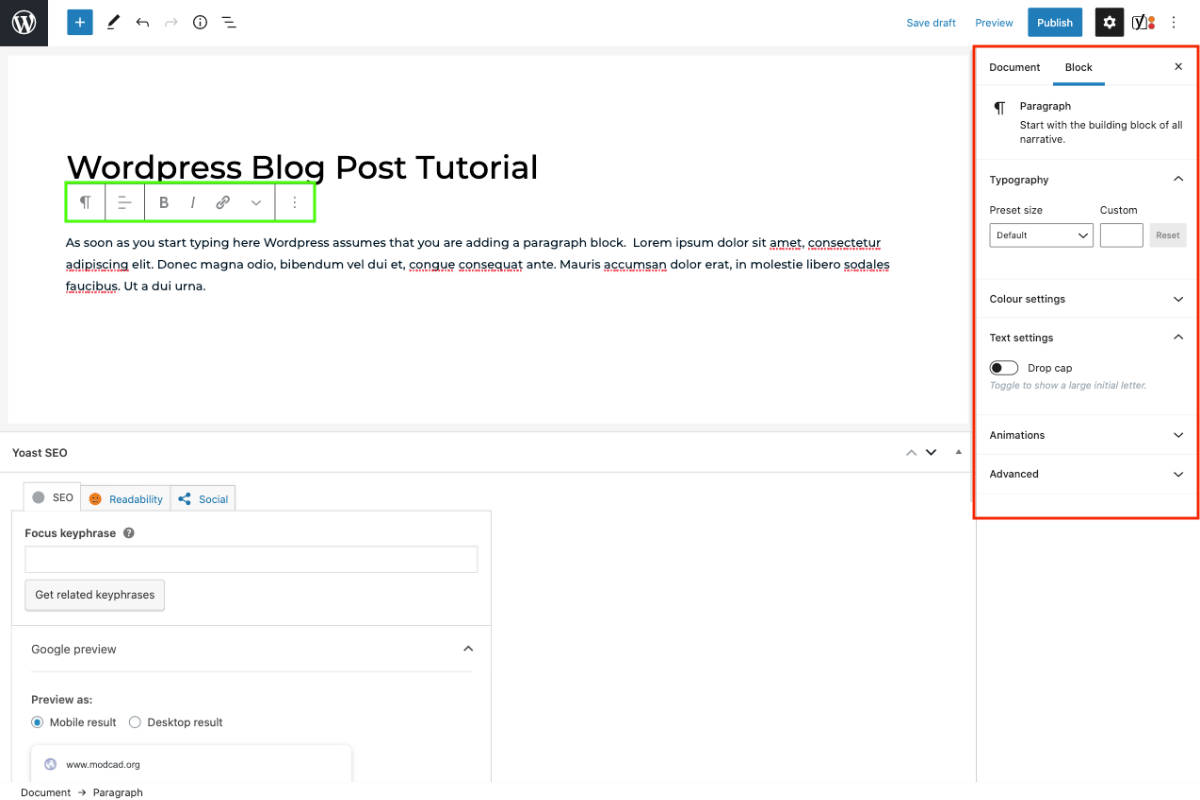
By Default WordPress creates a paragraph block as soon as you start typing. There are two sets of controls that appear when you select a block; the ‘Block Controls‘ highlighted in Green and the ‘Block Settings‘ highlighted in Red.
Tip: if for some reason the Bock settings are not shown then clicking the three dots in the Block Controls panel and then clicking ‘Show Block Settings’ will reveal them.
Adding More Blocks
To add another block (whether it be a new paragraph, image, list, table etc) click on the icon.
Tip: if you do not see the the icon then you’ve not finished ‘creating’ the paragraph block. To finish creating the paragraph block, click back onto the block, position the cursor at the end of the paragraph and click enter on the keyboard. This ‘closes’ the paragraph and allows you to add new blocks.
There are more blocks available than this tutorial can cover so I’m going to cover two essential blocks; the column block and the Image block.
Adding a Column Block
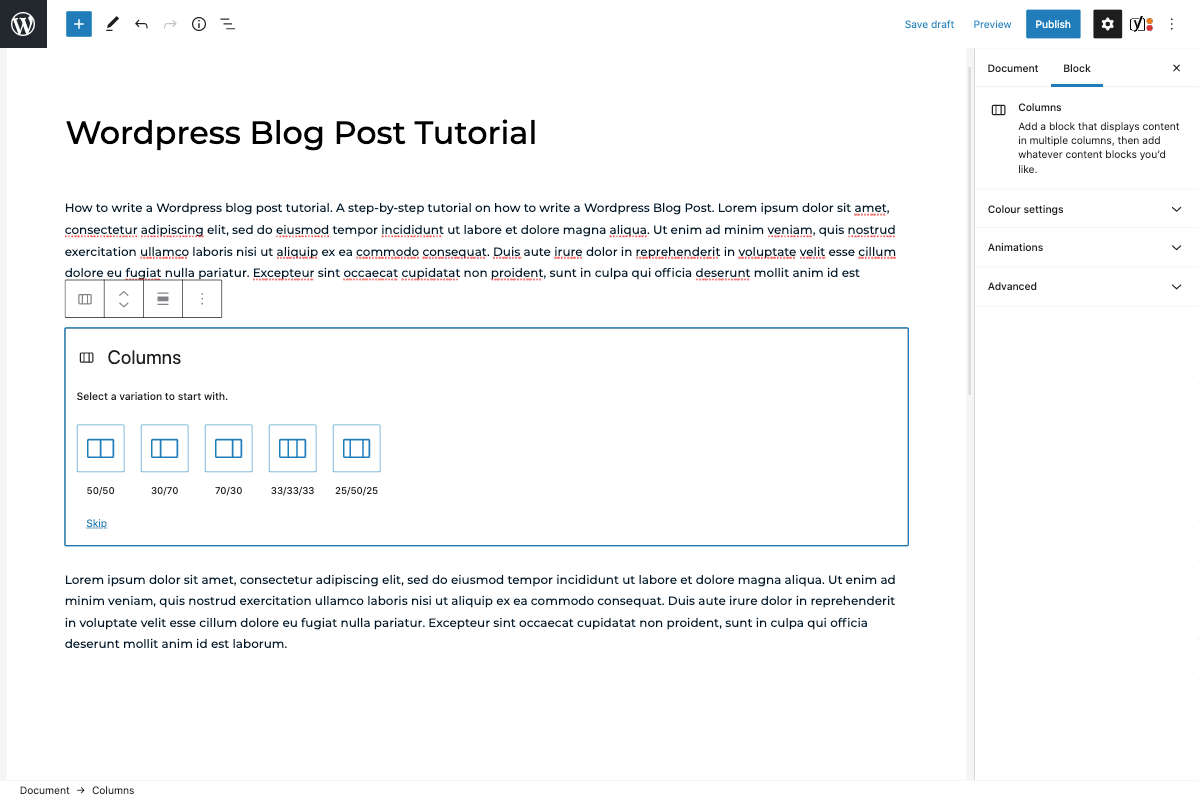
The column block is a really useful layout block, it allows (for instance) you to have copy either to the left or to the right of an image.
Click on the icon and either type in ‘columns’ into the search box and selecting the Columns block or click the ‘Browse all’ button and select the Columns block under the DESIGN heading.
The next step is to select the style of the column layout e.g. 2 columns 50/50, 2 columns 30/70. From here you can add whatever blocks you like (paragraphs etc) to each of the columns.
Adding an Image Block
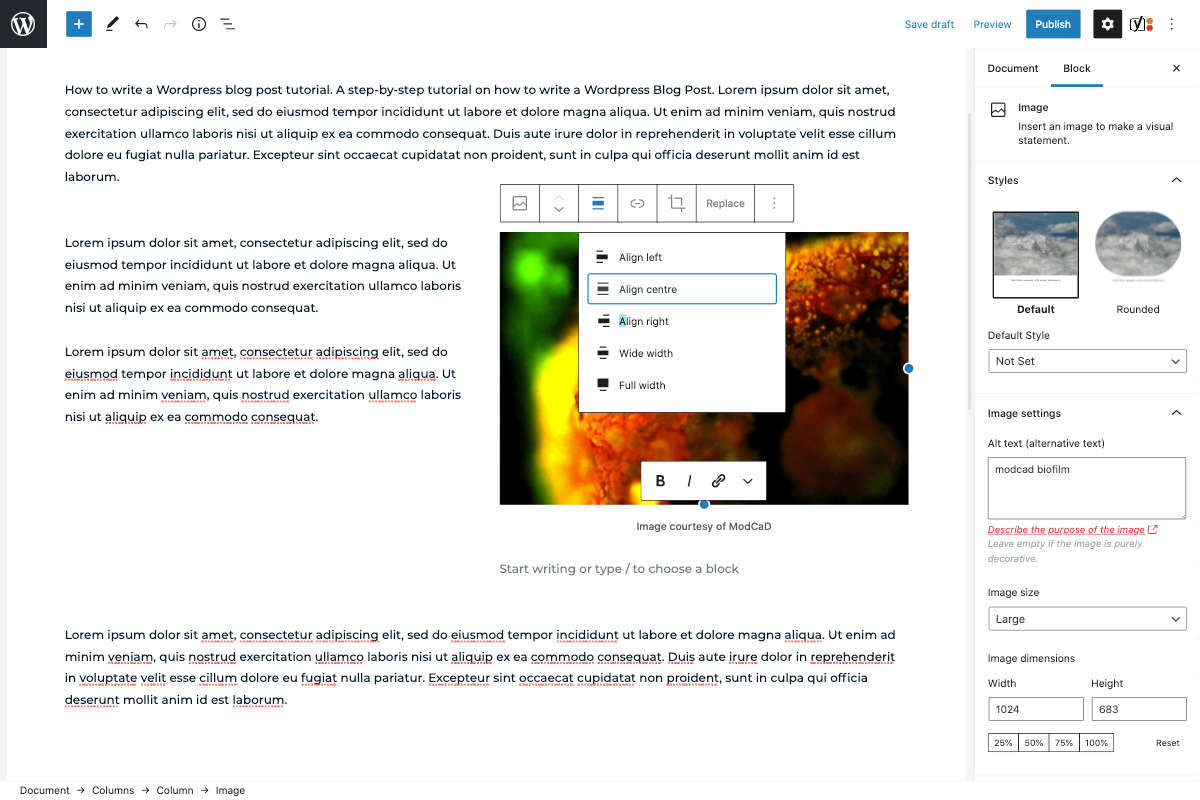
Continuing from the column block from the previous step we will add an image to the right column.
Click on the icon in the right column and either type in ‘image’ into the search box and selecting the Image block or click the ‘Browse all’ button and select the Image block under the MEDIA heading.
Either upload a new image or select one from the media library. You can add a caption if you wish and use the alignment tool in the Block Controls to set the text to align centre.
Save draft / Publish /Switch to draft
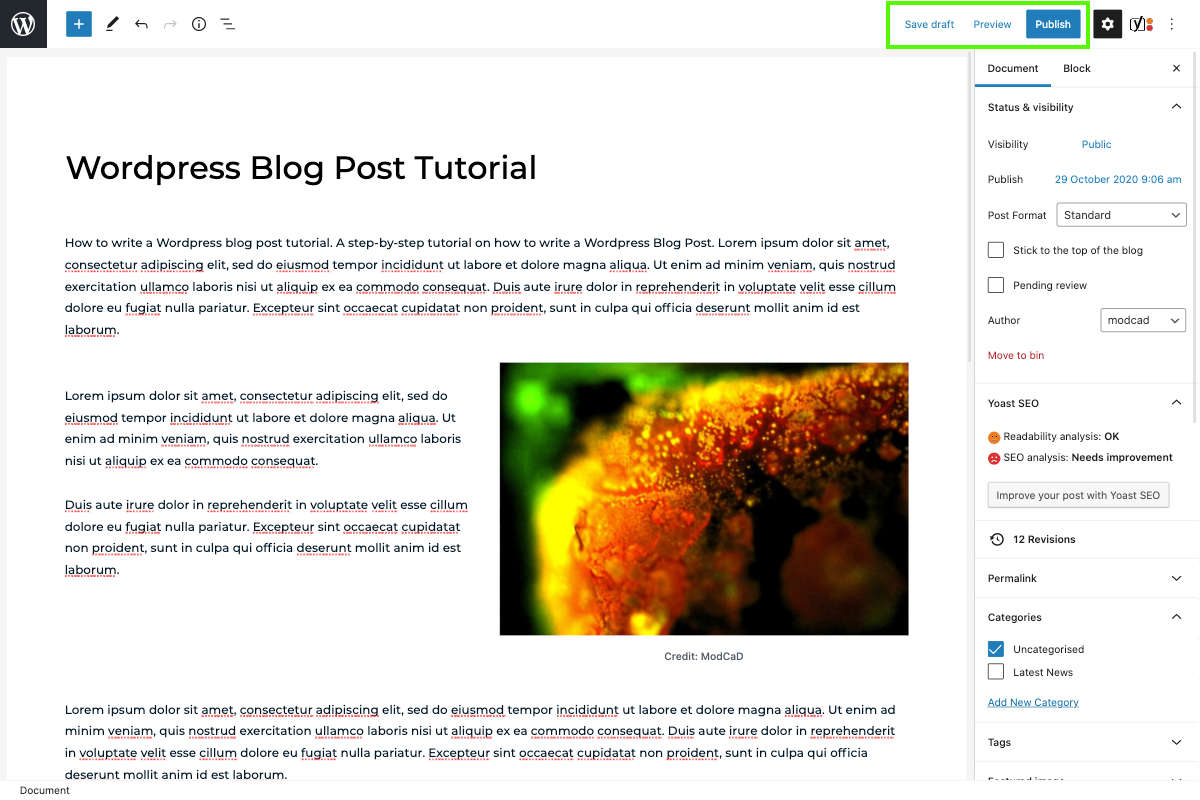
You don’t necessarily need to publish the post straight away, perhaps you need it proof reading before the post goes live. If that’s the case you can click ‘Save draft’. In fact I’d suggest clicking ‘Save draft’ periodically as you create the post just in case you computer crashes.
Once you’re ready for the post to go live you can click the Publish button and the post will appear on the front end of your website.
After publishing the post you can always click the ‘Switch to draft’ link and then Save draft to unpublish it from the front end.
SEO for Beginners
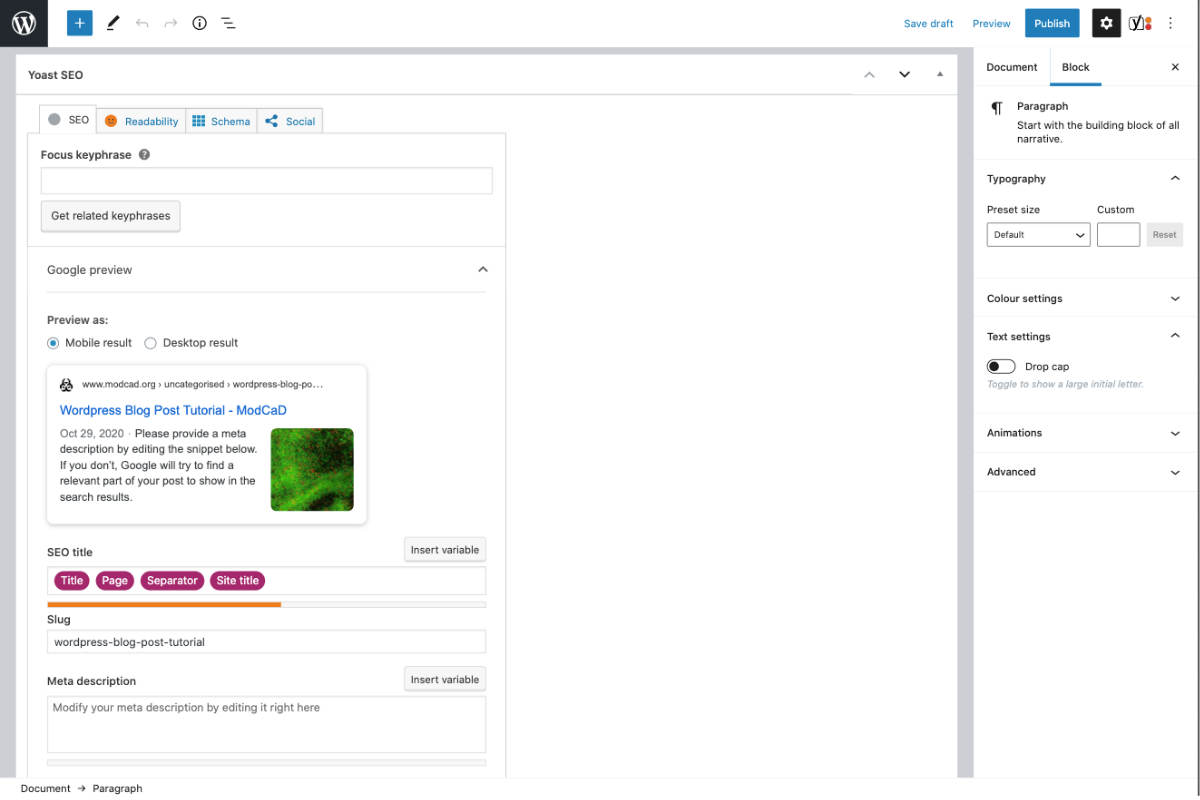
Again, I’m not going to go into and depth on how to SEO a blog post, there’s plenty of resources out there on the internet that you can view. I’ll quickly go over the basics of how to use the SEO plugin called Yoast. Scroll down the page until you get the the Yoast SEO section.
Focus Key Phrase: Fill in the ‘Focus Key Phrase’ field with the key phrase you chose in Step 1.1
SEO Title: Don’t confuse the SEO title with the Page Heading. The SEO title is a ‘hidden’ title that you can see when you hover your mouse over a browser page tab and is used by search engines to help index your site. The progress bar below the SEO Title turns green once the title length is good (orange if it’s too short and red if it’s too long). Yoast auto-generates an SEO title using the presets ‘Title’ ‘Page’ ‘Separator’ ‘Site Title’ but sometimes this doesn’t cut the mustard and needs to be manually edited. Take for example the auto generated SEO title for this tutorial, “How To Manage your own WordPress Blog Post – Philip Butler Freelance”. 1) it’s too short and 2) adding ‘Philip Butler Freelance’ doesn’t contain any keywords pertaining to this post. Manually changing it to “How To Manage your own WordPress Blog Post – A step-by-step tutorial” adds keywords that people may use to find the post and we get a green light because the length is now good.
Meta Description: this is another ‘hidden’ description that search engines use to index your site and this is an easy one for you to fill out since you will use the excerpt text that you’ve already written in Step 11. Assuming you stuck to the max 25 words you should automatically get a green status bar. Manually adjust if it’s too short (orange) or too long (red).
Yoast SEO Analysis
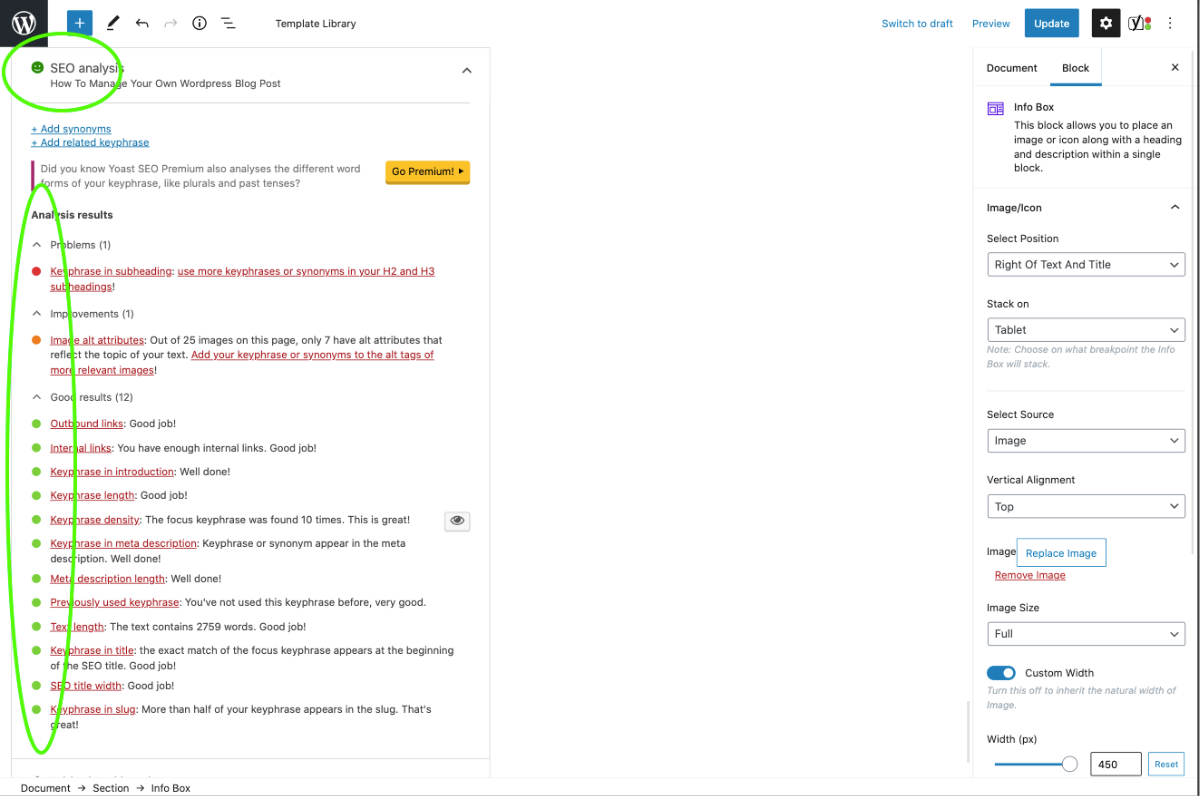
Use the Yoast SEO Analysis checklist to get an overall green smiley face.
You’re Done…. Or maybe not.
Fingers crossed the above step-by-step tutorial on How To Manage Your Own WordPress Blog Post has helped you get to grips with the WordPress editor, like everything, the more you try it the better and easier it will become.
Of course if the above has overwhelmed you or you feel as though you don’t have enough time in the day them I’m here to help whether it be administering your blog posts (you provide the copy and images and I’ll do the rest) or providing SEO support.
